Download the Theme
Acquire the theme zip file and save it to your computer in a known location.
Log In to WordPress
Log in to the WordPress dashboard of your website.
Install and Activate the Theme
After logging in to the WordPress dashboard of your website, select Appearance - Themes.
Click Add New at the top.
Click Upload Theme at the top.
Click Choose File at the top, select the theme zip file using your system file picker window, then click Install Now.
You should see something like this:
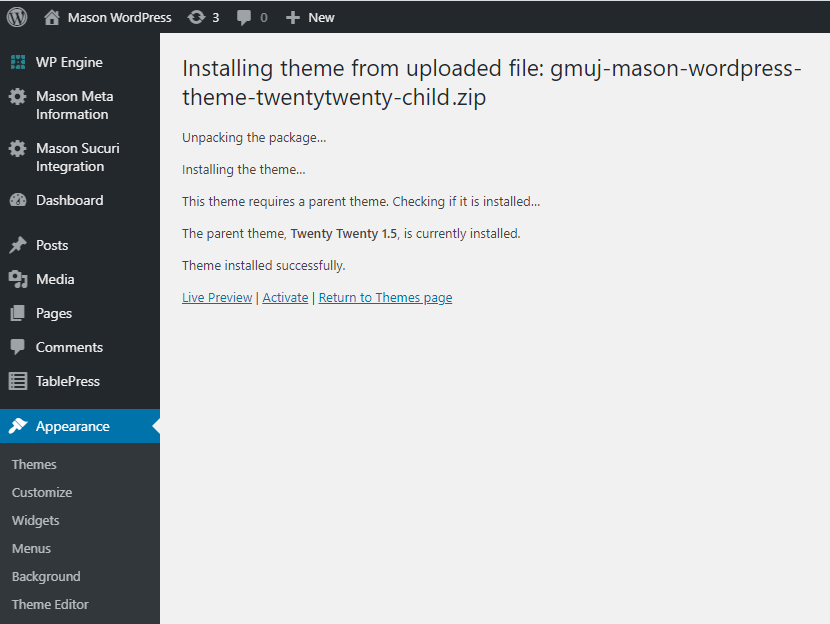
Click Activate.
Configure the Theme
Customize the Theme
In the WordPress dashboard, navigate to Appearance - Customize.
Set Site Title/Logo/Icon
In the WordPress theme customizer, open the Site Identity section.
Set the site logo and icon. You can find our default logo and icon images on the theme default images page.
Set the site title.
Optionally set the site tagline. This will appear only in the footer, above the contact information block.
Set Organizational Breadcrumbs
In the WordPress theme customizer, open the Organizational Information section.
The unit and department title and URLs set here are used to set the organizational links in the green “university breadcrumbs” bar. These allow you to refer users back to the parent unit and/or department of the website in question. All of these fields are optional, so set them as appropriate for your website.
Set Contact Information
In the WordPress theme customizer, open the Contact Information section.
The contact information set here will be used to fill the contact information block in the footer. All fields are optional. If data is omitted in one of more fields the website will use the standard university contact information.
Review Menus
In the WordPress dashboard, go to Appearance - Menus.
The main navigation menu of your site should be placed in the Desktop Horizonal Menu location.
Update Pages and Posts
When changing themes, you will likely also want to make some updates to your existing pages and posts. For the below changes, you will want to edit both Pages and Posts in bulk. Therefore you will have to repeat this process for both pages and posts.
To Edit Your Pages/Posts in Bulk
First, log in to the WordPress dashboard.
Go to Pages or Posts.
Ensure that all pages/posts are shown on a single page of results (so that we can select and edit all of them in bulk at once).
If you have multiple pages of pages/posts, open the Screen Options tab at the top, and set the Number of items per page to 999 and click Apply.
You should now see a single page containing a list of all of your pages/posts.
You can select multiple pages/posts using the checkboxes at the left, but you should select all pages/posts at once by selecting the checkbox above the table of pages/posts.
Finally, in the Bulk actions drop-down box above the table, select Edit and click Apply. This will open the Bulk Edit panel.
Set all Pages and Posts to use the Full-Width Template
The theme contains two page templates: a narrow template and a full-width template. While the narrow template is the default template, the full-width template will generally be better for most content. Therefore, you should set all pages to use the full-width template.
With all pages/posts selected and with the Bulk Edit panel open (as described above), we will now set the page template for all pages and posts.
In the Bulk Edit panel, select Full Width Template from the Template drop-down box.
Click Update.
Disable Comments on All Pages and Posts
Reselect all pages/posts and open the Bulk Edit panel, as described above.
In the Bulk Edit panel, select Do not allow in the Comments drop down box.
Click Update.
Review Widgets
In the WordPress dashboard, go to Appearance - Widgets.
Review the placement of your widgets. When changing themes, existing widgets will get automatically placed into widget areas in the new theme, and often not where you would want them. Specifically, if widgets get placed in the theme’s Sitewide - Alert Ribbon widget area, the site will not look right. For more info see the Incorrect Widget Placement section, below.
Next Steps
Review the theme information page to see what options are available in the theme. Familiarize yourself with the widget areas and menu locations.
Consider whether you need to move and custom CSS over from your old theme. If you do, you can add it to the Additional CSS section of the theme customizer.
Install the related custom plugins for your site. Specifically, take a look at what widgets are available in the Mason Custom Widgets plugin and consider using these widgets on your website, specifically on the homepage, which makes use of widget areas.
Review other Mason websites using the Mason Twenty Twenty theme to see what’s possible.
What Could go Wrong?
Incorrect Widget Placement
When switching to a new theme, WordPress will automatically place your existing widgets in any available widget areas in the new theme. Therefore you should initially confirm that widgets are placed the appropriate widget areas. Sometimes existing widgets get placed in the Sitewide Alert widget area (which occurs before all other site content), in which case you will probably see a lot of whitespace at the top of the site like this:
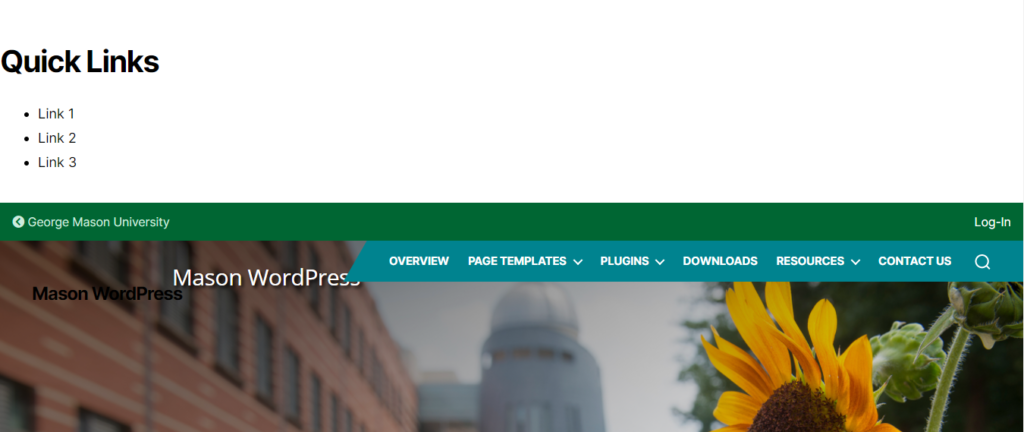
Fix this by moving this widget to a more appropriate widget area.
No Logo
If no logo has been specified in the theme customizer, you would probably see something like this:
Fix this by adding a site logo in the theme customizer.